
How to Make Rice
Or the way I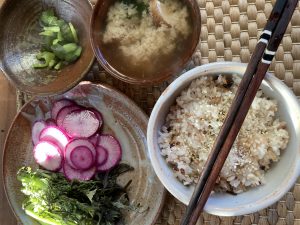 , Sam, a white male from Massachusetts, learned how to make Japanese Style rice
This is the method I know. I’m sure there are others. What I like about making the same, seemingly simple thing over and over again is that there is always room to improve your practice. And that all of your actions really come through in the final product. As in everything.
Materials
The pot – ideally medium size, somewhat heavy, and with a tight-fitting lid.
The water – pure, clean, free of chemicals, and cold.
The stove – a standard stove, either gas or electric.
The rice paddle – a shamoji. It’s singularly great at fluffing and serving rice.
The rice – Japanese short grain, white. Probably from California, as that’s where a lot of it is grown.
The Method
In this preparation, you are aiming for perfectly cooked grains, not mushy and not hard. You are aiming for rice that clumps together so you can eat it with chopsticks, and with grains that are not broken. You are aiming for a clean, pure flavor that takes well to the things that accompany rice, like pickles and miso soup – the classic simple Japanese meal.
Note: I use a rice cooker at home, and it still takes time, thought and attention to get it right. Here we’ll go over stovetop.
1 – Start with a US cup of white short grain rice. Put it in the pot you’ll be using.
2 – At the sink, pour cold water into the pot with the rice. You’ll notice white stuff in the water and maybe some bubbles. This is starch. You must wash the rice to remove the starch. If not, the rice will be ‘stinky’, as a friend once explained to me.
3 – Pour off the water. Cup your hand to catch any stray grains, as you do not want to loose any down the drain. In Japan, it’s sort of a sin to lose rice in this way. It’s disrespectful to the farmers. You have to take care.
4 – Now you have wet rice in the pot. Hold the pot, take your dominant hand and gently grab some rice and sort of swoosh it around, through and against the other grains. Not too firmly or vigorously, and not too lightly. You are rubbing the grains against one another to gently remove the starch. Repeat this motion a few times.
5 – Pour more water into the pot, sort of agitate a little, then pour this water off. There should be plenty of milky white starch in the water. Repeat steps 4 and 5 three to five more times, or until the water runs pretty clean and clear.
6 – Now add enough water to cover the rice. If you place your thumb on top of the rice in the pot, the water should reach the top of your thumbnail. As in, the water level above the rice is one thumbnail, uh, up. Note: there is a small amount of variation of moisture in any rice you’re working with. New rice has more moisture. You can slightly change the water level here depending on the rice. Real chefs in Japan can in this way get to ‘know’ the rice they’re cooking, how it cooked before, changes in the season and humidity. This is referred to briefly in the movie Jiro Dreams of Sushi and is pretty cool. Start with the thumbnail measurement method. The next time you make rice, maybe try slightly more or slightly less water. These are very slight variations we’re talking about.
7 – Let the rice soak in this water, covered, for 1 hour. If I recall, in Dogen’s Instructions to the Tenzo, he makes a point to say that you don’t want a mouse to fall into the rice, presumably at this point. He’s not wrong.
8 – Put the pot on the stove with the lid on. The lid stays on the whole time until right at the end. Definitely do not peek in to check on the rice during cooking – this will ruin it. Turn on the burner to high.
9 – Once steam starts coming out of the pot, turn the heat down to low.
10 – This is the part that takes attention and can really vary. The goal is to keep the steam inside going anywhere from 5 to 15 minutes. The water must be all used up but the rice inside can’t be scorched or stuck to the bottom of the pot. Don’t burn it. This part takes a lot of practice. I still get it wrong.
11 – Let’s say after 10 minutes of keeping it going in this way, on low, with the steam coming out but not too vigorously, remove the pot from the heat source. Again, do not open the lid! The rice is continuing to cook in the steam. Give it at least 10 minutes and really more like 15.
12 – Now take off the lid. Hopefully it’s not scorched, or mushy, or uncooked. Use the paddle to fluff the rice by gently turning it over and also by drawing the paddle through the rice, sort of like cutting it. Be gentle so as not to break the grains. Keep the paddle in a bowl of water – this helps rice not to stick to it. Put the lid back on to keep it warm until you’re ready to serve.
13 – Serve in bowls with miso soup and pickles, and maybe sprinkle with furikake.
Photograph and Rice Method from Sam Reggio (our first ABZS morning Tenzo)